The Geoscience plugin includes tools to display drill holes, down hole data and sections in QGIS. This includes desurveying the holes using collar azimuth and dip and/or survey data.
Prior to using Drill Tools you need to open the collar, survey (optional) and down hole data (optional) tables in QGIS. You can use any format supported by QGIS including shapefiles, MapInfo Tab files or CSV files (Note: Geoscience doesn’t support database layers. If your data is in a database, first export your layers as Geopackage, Shapefile, CSV etc). To open data using CSV, use the existing Delimited Text tool ![]() .
.
Important: Drill Tools will only work with projected coordinate systems (ie not latitude and longitude).
Geoscience will create new layers with names based on the original file names. It’s suggested to give your original files short, simple names (eg. Collar.shp, Assay.csv etc). Once Geoscience has created a file name then you shouldn’t change it because Geoscience might not be able to identify the file again.
The workflow to display the surface projection of drill traces follows. You will also need to do this if you want to display sections.
Load Data
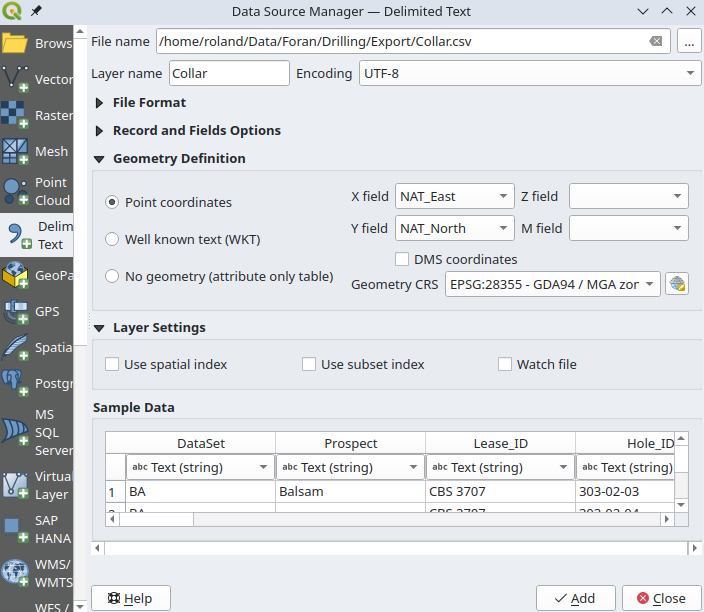
- Open the Collar layer. If using the Delimited Text tool in QGIS, select Point Geometry and the appropriate columns for Easting and Northing, followed by the Coordinate Reference System. Do not put anything in the Z or M fields because Geoscience is expecting this to be a 2D layer.
- (Optional) Open the Survey layer. If using the Delimited Text tool in QGIS, select No Geometry to just import the data columns.
- (Optional) Open the Down hole data layers. You can use multiple layers (eg. lithology and assay) and if you are using the Delimited Text tool in QGIS, select No Geometry to just import the data columns.
Desurvey Holes
- Choose Geoscience -> Drilling -> Desurvey Data or click the
 button on the toolbar. Select the appropriate fields. Note that all fields will be guessed by Geoscience if sensible names have been used. Choose the Desurvey Length. Drill holes will be reconstructed using straight line segments of this length. Click OK and a new layer is created and loaded in QGIS. You can now see the surface projection of drill holes.
Want to know more about desurveying drill holes?
Process Downhole Data
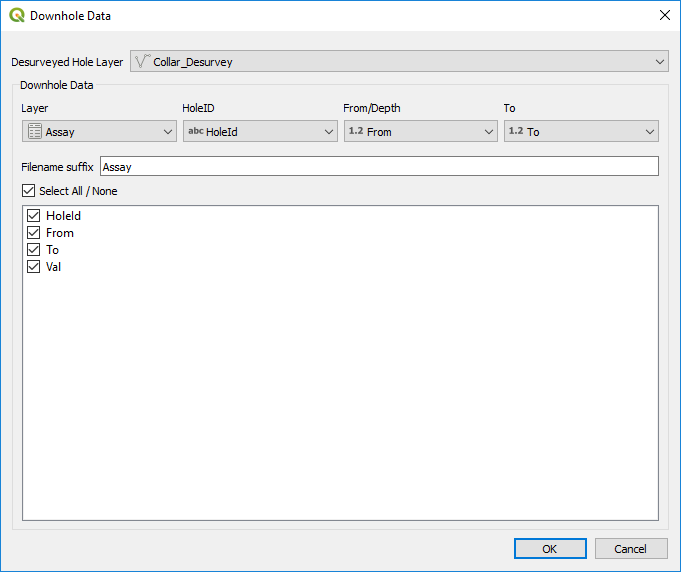
Choose Geoscience -> Drilling -> Downhole Data or click the ![]() button on the toolbar.
button on the toolbar.
- Select the desurveyed hole layer. You can have multiple sets of drill hole data loaded at once, or you might want to use a desurveyed layer in a different QGIS project.
- Choose the source Downhole Data layer and the appropriate attribute fields for HoleID, From and To. These are chosen automatically if sensible names are used.
- Check all the attribute fields that you want to include in the downhole data layer to be created. You will use these for symbology on the line segments, so be sure to include any attributes that you will need.
- You also need to provide a brief descriptive name to be appended to the layer name. A default is provided, but this will depend on how your layers are named.
- The downhole data layer is created using the name “CollarLayerName_Downhole_NameFromStepAbove”, then loaded into QGIS. Each row contains one polyline for each From-To interval from the source layer.
- Symbolise the new layer to display the attributes as you desire.
You are now ready to create sections.